Friday, June 20, 2014

DIY: Denim patchwork tablecloth

Sitting on the screen porch during a thunderstorm with a glass of Cabernet, I got this brilliant idea!  Why not make a tablecloth for the patio table?  It's a 48 inch round table, and I started to think about what fabric I had in my supply that was durable and washable.  And voila!  Denim!


I had been collecting denim over the past couple of years to create my own design of denim purses.

And like most hobbies, one day you suddenly realize  that you've collected more than you can use...

And so it seemed like a tablecloth was a great way to use excess supply of denim.


And so I started my tablecloth with a vague notion of large pieces of denim that I could piece together. Next thing I knew, I was imagining a tablecloth made of patchwork denim "quilt" blocks.  I can't say where that idea came from except from my long lineage of quilters including my grandma, mom and sisters.  

Here's a quick review of the steps in making this patchwork denim tablecloth:

1.  I created a 6 inch square block out of cardboard and used this to trace on different pieces of denim jeans.  I also created a  6 inch by 12 inch card board block, and traced this on the denim to add some interest to the tablecloth.       
Supplies: Denim, scissors, ruler and cardboard
                         
2.  I cut out so many denim blocks that my hand ached for days.  Glad for a good scissors, I wished I had a rotary cutter instead.  

3.  I didn't want a long tablecloth that would be in my lap while I was eating, so I tentatively planned on a 54 inch diameter tablecloth.  Basically this would cover the 48 inch table and hang down a couple of inches on the sides.

4.  I pinned the blocks together in rows, and laid these out on the table until I thought I had enough rows.  I alternated light and dark denim wherever possible to give it a patchwork appearance.  
Always good to have a good helper like Blue Belle!


5.  To prevent fraying of the denim, I used a zig zag stitch on the edge of each block of fabric.  This is a very tedious step, and believe me when I say I used up two spools of thread on this project.
Zig Zag stitches


6.  I stitched the fabric blocks by pinning the right sides together and sewing a straight 1/4 inch seam.    I then pressed the seams open to give them a flat appearance.


7.  I then sewed the rows together by pinning the right sides together and sewing a straight 1/4 seam.  Once again I pressed the seams open.  As I sewed the rows together, I realized that each row should be the same length, and I added a few more blocks to some of the rows.

8.  The next step was cutting out the round shape of the tablecloth.  Here's where I asked Mike for some help.  We located the center point of the fabric, and using a 27 inch string (the radius or half the finished size of 54 inches)  with a Sharpie tied to the end of the string, Mike traced  a circle around the sewn cloth.  
Mike and Blue Belle working with string
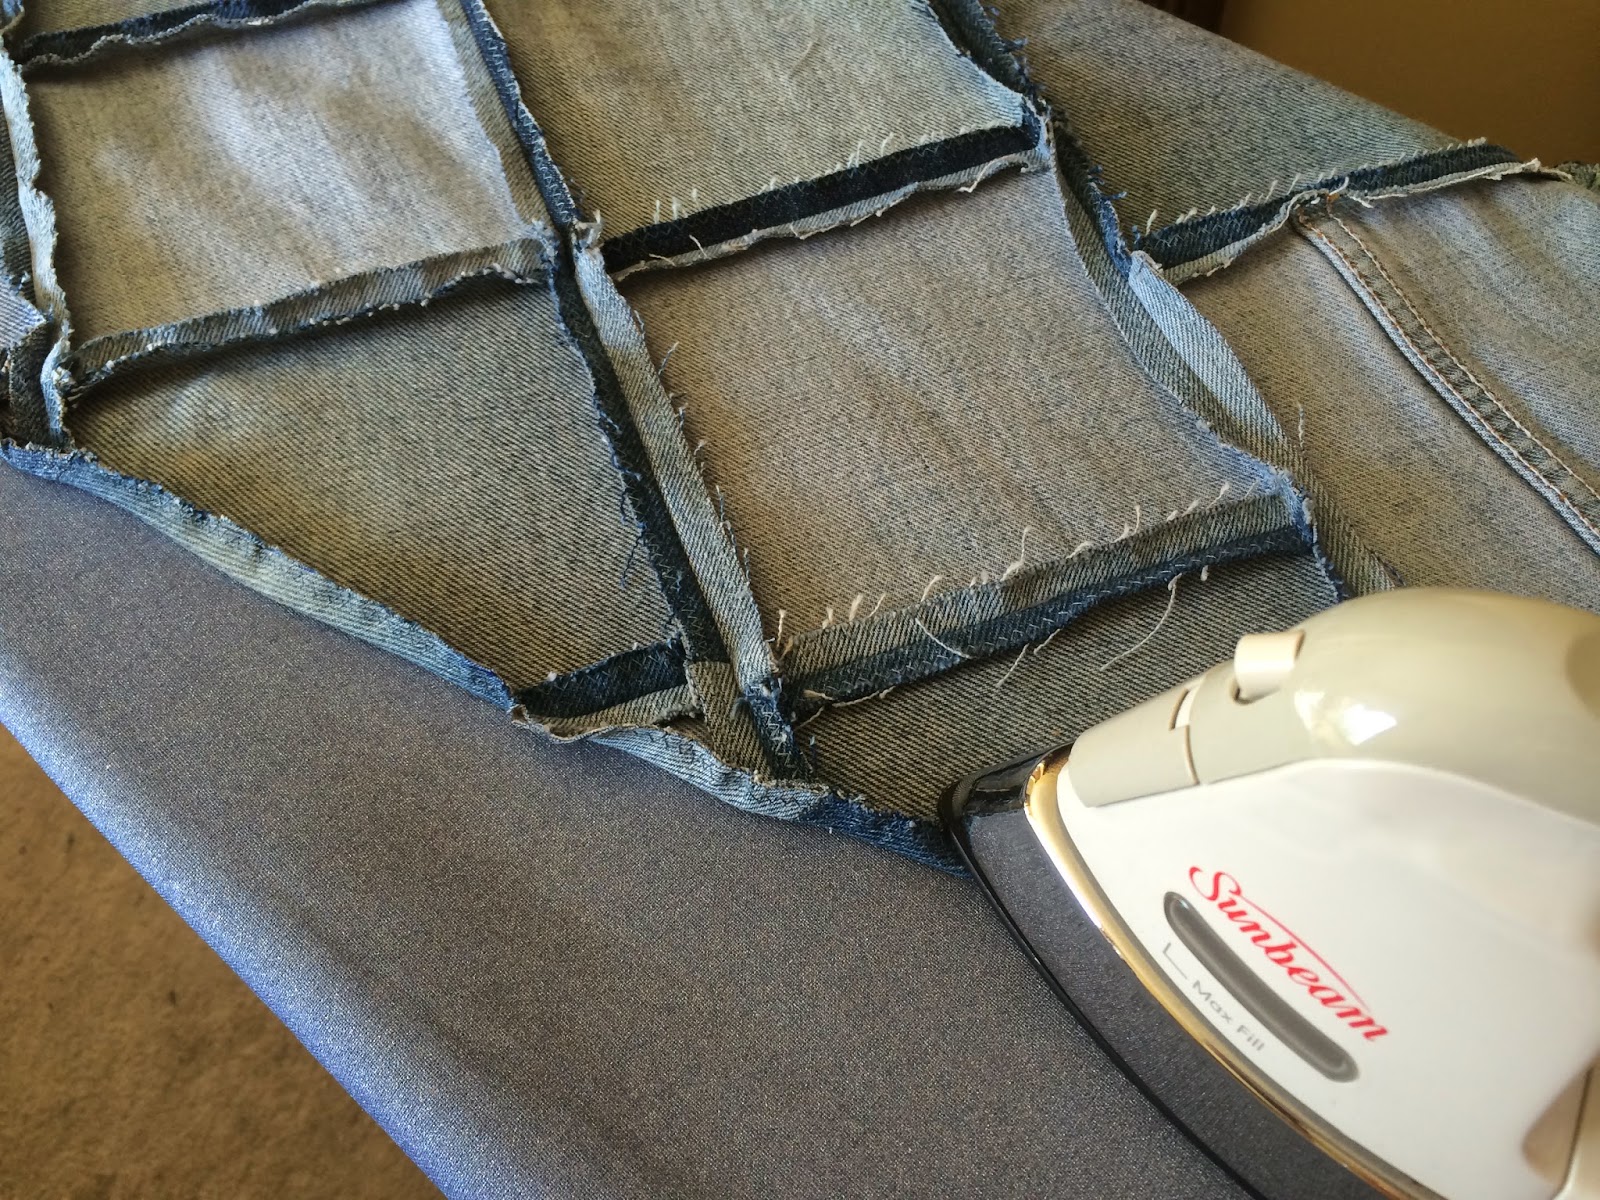
9.  I cut the fabric using the guidelines from the Sharpie.  The next step was to zig zag stitch the edge, and press 1/4 inch of fabric under the tablecloth.
Pressing the 1/4 inch seam around the tablecloth

10. I then sewed the 1/4 inch seam around the outside of the tablecloth.

Sewing 1/4 inch seam
11. As final steps, I washed the tablecloth, and then cut off any loose threads on the underside of the tablecloth.  I then pressed the tablecloth before using it.

And here is the finished product:  a denim patchwork tablecloth.  


Overall, I am very happy with the result of this little impromptu project.  I love the colors and patchwork design.  I like the heavy denim fabric and how it protects the glass table top.  

Here are some things that surprised me about this project:

1. It took a very long time.  I estimate that I spent about 25 hours on this project!  WOW!  Much longer than I expected!

2. Denim is a tough fabric to sew.  I broke at least one sewing machine needle sewing this thick fabric!

3. The tablecloth isn't as flat as I expected. And when you set a glass on the tablecloth, you have to be careful to avoid the seam, or the glass may tip over.

4.  Ideally you might want a backing on the tablecloth to avoid further fraying of the fabric.  I thought about it, but I realize I was "done" with this project, and good enough was good enough!

5.  My cat loves it! 


I hope you are having a great week!
Diane

Tuesday, June 17, 2014

DIY: Converting antique bed to queen mattress

Original full size antique bed
It was the week before the Indy 500 Race, and we had two couples coming for the weekend.
One of our guest rooms was well-equipped with a queen size bed, but the second guest room had a full size bed(that previous guests complained about).

Granted the second guest room was filled with a beautiful antique bed and matching dressers over 100 years old, but that was part of the dilemma. Do we replace the mattress with another full size mattress, or could we somehow fit a queen size mattress?


When I initially approached Mike about the idea of a queen size mattress, he didn't want to remove the antique furniture in the room.  But a funny thing happened overnight.  Mike woke up with an idea for converting the full size antique bed into a queen size antique bed.  And his idea was to preserve the original antique bed without damage, in case the Antiques Road Show ever came to town.

Of course as these things happen, we had only 3 days to find and buy a mattress, convert the antique bed, have the mattress delivered and be ready for guests on Thursday evening.

Were we up for the challenge, or just plain crazy?  Yes and yes.


Mike did all the work on this project, and I asked him to describe his steps.  

1.  Measured headboard and foot board width and checked queen mattress dimensions on Google.  Determined that headboard and foot board were just slightly smaller than width of a queen mattress.  Decided we could make this work.

2.  Removed full size mattress and box spring set to gain access to the embedded bolts of the antique wooden side rails.  Removed the side rails from bed with quarter-turn repetitive turns.

3.  Checked the size of the embedded captive nuts in headboard and foot board by inserting 3/8" and 5/16" bolts.  These did not fit and were not a common thread.

4.  Used a long magnet stick and ice pick to extract the non-standard captive nuts from the square leg sections of the foot board and headboard.

Removable metal tab
5.  Since it had been so difficult to remove the embedded captive nuts(with magnet and ice pick), I decided to create steel tabs that could be used to easily remove the new nuts.  I also decided to use 5/16" tee-nuts.  To create the steel tabs,  I  cut 4 pieces of steel, ¾” wide and 1/8” thick.  I then drilled holes for the 5/16” tee-nuts, and I silver-soldered the nuts into the steel stock and cut them flush with the stock.  So now I have a common size nut(5/16") and a removable tab.


Queen size metal frame


6.  We purchased a queen metal frame designed for use with a modern brass bed.  This had brackets on each end designed to attach to a headboard and foot board.


Paper template tracings


7. Next step was to create wooden adapters as an interface between the metal bed frame and headboard and foot board. This was necessary so we didn't damage the antique.  I created a paper template of the holes by affixing a piece of paper over the headboard and foot board holes and used a lead pencil to lightly rub and create an outline of the holes that match the dowel pin locations and also the access hole to the  captive nut.

8. Using the paper templates, I created four oak transition pieces.  I drilled 1/2" dowel pin holes and 5/16" holes for the bolts(which matched the 5/16" diameter bolts in the new bed frame.

 9.  I used the largest bolts possible for maximum strength.

Mike affixing the oak adapter pieces
10.  After drilling these four oak adapters, I mixed various wood stains to get the right  color to match the antique.  I stained those surfaces that would be seen outside the bed frame.

11.  The dowel pins were installed to where they protruded slightly from the oak adapter pieces so that I could align them to the headboard and foot board.  At this point I  tapped them in with a small hammer and inserted the 5/16” bolts through the  captive nut assemblies on each corner to tightly secure them to the antique headboard and foot board.

Bolts and dowels in place
View from outside the bed


12.  With the wooden adapters secured,  we stayed consistent with the original bed frame height and to be able to store stuff under the bed.   I raised each corner of the bed frame  and used  5/16” carriage bolts, washers, and nuts through the slots of the metal  bed frame to secure it firmly to the headboard and foot board.

New dowel legs for additional support
13.  I decided to use a 2" diameter hardwood dowel (stained to match the wooden adapters) to create 5 supports for the correct height of the metal bed frame.  I drilled the top of each of the 5 supports with a 1” Forstner bit to slip over the five vertical tubular steel  foot  supports(already on the metal bed frame). I drilled the bottom with a 3/8" hole to fit the adjustment screw on the metal frame.

14. I hammered furniture t-nuts into the bottom of each of these dowel sections, and threaded the feet into them.   I slid these wooden leg extensions onto the  bed frame and used aluminum shim stock to take up the slack between the vertical tubular steel and the 1”  diameter holes.

Queen mattress in place
Finished product
The project was finished ahead of schedule, and our guests enjoyed the new bed during the Indy 500 race weekend!

Mike did a fantastic job completing this project, effectively compromising between his desire to keep the antique bed intact, and my desire for a queen size bed.  I am now convinced he can do anything...

Diane

Monday, June 2, 2014

4 years cancer-free!

It's a subject I don't talk much about, but I am a breast cancer survivor.  As I told a friend yesterday, it doesn't define me, it's just something that happened to me.  I continue to travel to Des Moines annually for my mammogram, blood tests and appointment with my oncologist even though it's 450 miles away. I don't know, but there's something very comforting about the doctor who has seen you go through all of this.

So last week Mike and I trekked to Des Moines for this annual check up, and all is well!  No signs of cancer!  I don't think about cancer a lot, but when this appointment approaches each year, I start to get nervous.  And on the day of the appointment, I'm sure I'm holding my breath playing all the "what ifs" through in my mind.  And when the doctor says "the mammogram is fine", I start to breathe again.  If you or a loved one has been in this situation, I know you understand.


And I push cancer to the recesses of my mind for another year, or until some other health issue where my brain immediately goes to cancer.  I am getting used to this sub-process that continually goes through my brain.

Emily and Brian


The other good thing about the trip to Iowa is I get to hook up with my pals from working days.  It made for an action packed week, but it was so much fun to talk and laugh and catch up on life.


We visited with Brian, Emily and Maggie and got to meet the newest addition to the family, Brody.  They are very busy with two small children, but they still manage to have fun!

Maggie, Emily and Brody


Dinner with Kristi


I had a great dinner with my friend Kristi at a new restaurant in Ankeny.  We reminisced about our car-pooling days which seemed like yesterday (actually 3 years ago).  We talked for hours, and it seemed like I had never moved away.

I enjoyed a quick breakfast with Joyce, and we packed a lot of talking into a short hour.  And I lived vicariously with her upcoming travel to London, Spain and Morocco.


Mike, Gary and Joleen

Then it was on to drinks and dinner with Gary, Roby, Joleen and Randy.  We laughed and laughed about everything from jobs, to raising kids to Mike and I learning to live together 24x7.


And  we had breakfast with Ruth and caught up on her new summer job in a greenhouse.  She is having a blast working hard and learning lots of new gardening stuff.


I am reminded that everything continues to change.  My friends and their lives keep moving ahead, but I am comforted to know that our years of working and playing together is a common bond that doesn't go away with a few hundred miles...

And so we're back in Indy now.  June has arrived, bringing Mike's "summer vacation" and a clean slate of time.  I'm sure new adventures await...

Thanks for taking the time to read my blog.  I appreciate your interest in my crazy life, and I welcome your comments any time!

Diane

Friday, May 16, 2014

Beauty in a quiet walk

Wheat and sky
It was a rainy few days in Southern Indiana, and I decided to head out into the cool evening for a walk after dinner.  And I was amazed at the beauty I found in a quiet walk. Fortunately I had my iPhone at the ready, and I think the pictures captured the moment


Red barns

Majestic clouds

Creek was raging one day ago after 2 inches of rain

My grandparent's home 

Simple iris

Round

Yucca

My shadow in wheat
Hope you are having a great week!
Diane

Tuesday, May 13, 2014

May in Indy

May in Indy is bustling with activity.

Diane & Mike with the band


First, we celebrated Cinco de Mayo with friends.  There was great food, a mariachi band and a few drinks along the way...


Kathy dancing with the band


selfie...


And of course, RACING!  We attended the first ever Grand Prix of Indianapolis last weekend.

 It was very cool to attend this new racing event at the Indianapolis Motor Speedway, and along with 50,000 other fans we enjoyed a beautiful, sunny day and some great racing!


Entering the first turn


And it's a bit different from an Indy 500 race.  First the course itself is different, combining the oval track and a track cut into the "infield".  Also the cars race in a clockwise direction, and we had a great view of them heading into the first turn.


The tower and the stands


Racing underway


Busy at work...

Mike is spending every spare moment grading papers these days as the Spring quarter draws to a close.


Irises (transplanted from Iowa)


And I'm planting, planting, planting.

Ok, here goes my first of many summer pictures of flowers.  I know it's what you've come to expect of me, and I don't want to disappoint...

Wave petunias in a re-purposed patio chair 
Front porch
Petunias on the deck


Finally it feels like Spring has arrived.  I hope you are enjoying it, wherever you are!

Diane


Monday, May 5, 2014

Taking a vacation from retirement

Daffodils in snow the week we left for vacation
I know, I know...it doesn't seem like you would need a vacation if you are retired.  What can I say?  It was a very long winter!


Sometimes you don't know you need a break from chores and schedules until you get away.  And gain a different perspective.  And relax.  And that's just what we did...

We headed to Mexico for a week of sunshine, warm weather and the ocean.  And oh yes, food and drink.
Miles of walkways at the resort


The resort was absolutely beautiful, set in the jungle with beautiful palm trees, coconut trees and wildlife.  The lodging was spread throughout the jungle, and we walked miles each day between restaurants, our room, the pool and the ocean.


Courtyard where we listened to live music at night


In front of one of the many water features


One of many...

Coati (usually they were traveling in packs in the woods). Kind of scary


We enjoyed fantastic food at all the restaurants including French, Indonesian, Japanese and Mexican.  It was some of the best food I've ever eaten!

 And I was a bit more adventurous this time, eating French, Indonesian and Japanese for the first time. And loving it!


Pool outside our room


We had a beautiful pool outside our room that stretched in front of several buildings.  We also enjoyed a much larger pool where we floated for hours and enjoyed drinks at one of the two swim up bars.

Mike under aquaduct waterfall


The white sand beach was pristine, and we kicked off our shoes and walked and walked.


We enjoyed a snorkeling trip on a large catamaran.  Well, Mike enjoyed snorkeling, and I enjoyed laying on the boat and watching the water.  I've tried snorkeling before, but  I prefer to stay away from fish and other ocean creatures.  And generally my philosophy is that if we were supposed to swim in the ocean we would have gills.  Usually Mike tries to convince me to snorkel, but truth be known, he probably had more fun without me as a nervous Nellie beside him.

A caption defies me ...


About half way through the week Mike finally relaxed and quit worrying about all the stuff he wasn't getting done at home.  And as he proudly said at the end of the trip, "I didn't fix anything on this vacation".  And that's definitely relaxation for him...
Enjoying the cigar bar


We've been home a week now, and we are as crazy busy as ever.  But I can still see that beautiful beach in my mind, and I smile...


Diane