Thursday, July 24, 2014

A day in the life of a retiree

I thought I understood busy when I was working 50-plus hour weeks as a Program Manager  in an international  insurance company.  Long hours at work, chores in the evenings and hundreds of miles of weekend driving to see my husband who lived in another state. Now that was busy.

But much to my surprise, life seems equally busy in retirement. And my retired friends all say the same thing.  They still don't have enough time to do everything they want. 

Like most, I wasn't sure what to expect in retirement.  How would I spend my days when I didn't awaken at 5:45 a.m. each day, spend countless hours in project meetings, eat lunch at my desk and leave work around 6:00 p.m.?   Surely I would much more time available once I left the work rat race.

I dreamed of a retirement where I would relax, read books, take leisurely walks and bike rides with my sweetie, spend time with friends and family, travel and write a book. In my dreams retirement would be an idyllic, calm environment where I could stretch my creative wings.  Sounds wonderful, doesn't it?

But here's the reality.  My retirement is crazy busy!   And as I talk to retired friends about how busy they are, I decided this might be a good blog topic.

At the risk of boring you to death, here's a summer day in the life of this retiree.  Not glamorous but certainly action packed...

  • Get up around 7:30 a.m. without an alarm
  • Enjoy a leisurely breakfast in Mike's sunny study, drinking tea and catching up with news, emails and blogs on my iPad.
  • Clean the kitchen, and as much as I hate to admit it, this sometimes includes washing dishes leftover from the previous night's meal.
  • Shower and get dressed in my usual attire of shorts and a t-shirt.  I absolutely love this carefree style of dressing compared to that of the financial services industry. 
  • Do laundry. Repeat. 
  • Work on the day's projects.  Fortunately we don't need a lot of meetings, but similar to work  there are always more projects than time or money.
  • Here is a quick list of our summer projects: 

    • Clean and paint antique cast iron chairs I bought at a garage sale


      Removing chipped paint with wire brush

      Painted with rust-converting primer
    • Help Mike re-build the screen porch 
      Buying red cedar posts at an amazingly large lumber yard

      Mike cutting an existing beam (don't worry, the porch is held up by floor jacks)


    • Create a new flower bed
    • You just can't have too many flower beds
    • Remove ornamental grasses from the yard, till the soil, add peat and plant grass seed 
      Mike tilling "away the moments that make up a dull day" (to quote a Pink Floyd song...)
    • Paint the music room
      No longer a boring white color
    • Dig weeds taller than me and remove a tree stump the side yard
    • And when I really need a chance to relax I escape to my study for some creative projects like jewelry making, sewing purses or denim tablecloths.


Oops, perhaps I got carried away with projects.  Here's the rest of the day...

  • Head out to lunch with Mike at one of our favorite restaurants where we leisurely enjoy lunch with iPads and lots of iced tea.  
  • Run errands on our way home including necessary project stops at Menard's, Lowe's, Target, Joanne's, Michael's, and yes of course, Goodwill.  
  • Spend the next 4-5 hours working on projects.
  • Exercise if we have time.  I know. I know.  Excuses still exist when you retire.
  • Start fixing dinner around 7:00 p.m.
  • Eat dinner on the screened porch around at 8:00 p.m.
  • Finish the evening on the porch with a glass of wine or Mike's recent drink concoction of a "light" raspberry/pomegranate martini.
  • Watch the evening news.
  • Call it a day and crash for some of the best sleep I've had my entire life.
And I want to mention the great times with family and friends staying overnight at our home, which we've lovingly named The Red Bird Inn bed and breakfast.  This summer has been especially busy with guests starting with Kevin and Kathy and Gretchen and Craig during the Indy 500 weekend and continuing with:

  • My mom's visit in late June

Eagle Creek pontoon boat ride with mom

Lunch with mom in Broadripple

  • Gretchen and Craig stopping by on their return from a wedding in New York

Great visit with Gretchen and Craig

  • A visit this week with my friend Ruth from Des Moines

Lunch with Ruth after biking the Cultural Trail in downtown Indy


And we continue to enjoy time with our friends in the Indy area.  We spent a cool July evening with our friends Atanas and Elena and their sons.
A lovely evening with Elena and Atanas
Martin and Alex enjoying musical instruments 


  • For the July 4th weekend, we traveled to south eastern Indiana with friends for a George Thorogood concert followed by a day of wine-tasting.
George Thorogood Concert

Lunch with Chris and Garth, Terri and Darwin and Terri and Scott at Huber Winery
Ok, I admit it.  I'm tired just thinking about all of this activity.  But really this is a path of our own choosing.  We love this life, even though it's busy.  We recognize that we have a lot of interests and projects and are fortunate to have great people in our lives.  And maybe it's just our personalities, or the busy 21st century, but we still have too many things to do in not enough hours.  Just like when we were working, but a key difference now is that we have the luxury of choice.  We can decide how to spend our waking hours.

Just like working days, I still collapse into bed each night.  But now I fall asleep smiling about a fun visit with friends or accomplishing a task I'm excited about instead of agonizing over a work-related problem.  Not dull, this retirement life, but definitely a new definition of busy...

Diane

Tuesday, July 8, 2014

House Makeover: Re-purposing Rooms

If you are like me, you have at least one room in your house that you don't use much.  Possibly it became a storage room or junk room over the years. That's when  I take a hard look at the room.  And the wheels start turning...Could I use the room differently?  Could I re-purpose the room to meet my family's hobbies, interests or lifestyle?

Very comfortable study
When I first moved into this house,  formerly "Mike's house", and now "our home",  I wanted a room of my own for reading, writing and hobbies.

One of our upstairs bedrooms was a storage room for Mike's memorabilia from his family, college days and career.  We agreed this was the best room for my study, and so I got to work packing up the memorabilia in plastic bins to be stored in the basement.

Pottery Barn table as a desk


Wanting a bright, cheery room, I selected a Sherwin Williams Tangerine(SW6640) for three walls and Outgoing Orange(SW6641) for the accent wall.  After I finished painting, we moved in two chairs and a desk from my house.  I added sheer curtains and some favorite art, and voila, I had a newly re-purposed room.

Today I use this room for writing, reading, napping and watching television with my sweetie on cold winter nights.  Mike and I both love hanging out in my study.  It's a cozy oasis!


Studio


And as I got settled into our home and retired life, I found time for long-neglected hobbies.  I wanted a space where I could spread out my beads or sewing project.  And if I didn't finish the project for several days, and provided the cats didn't disturb it, it would be waiting for me exactly as I left it.

There was a Jack 'n Jill bathroom adjoining my study and another bedroom.  It was a huge room with two sinks and mirrors and a separate room with toilet and shower.  Basically it was intended to be a shared bath between two bedrooms.

I imagined the early morning light through the huge arch window illuminating my studio, and Mike and I agreed this was the perfect place for hobbies!

I painted the room Sherwin Williams Compatible Cream(6387) which has a soft yellow hue(unfortunately the picture doesn't accurately reflect that). We added honeycomb blinds and drawer storage units from The Container Store.  This is where I store beads, sewing and painting supplies. And the final touch was re purposing my parent's 1960 vintage kitchen table to serve as my work surface.

So now I have a wonderful little alcove for my jewelry, sewing and painting hobbies.  And yes, I've already heard all the jokes about the convenience of having a toilet nearby...

Formal dining room with brass chandelier
And then there was the formal dining room.  It housed Mike's grandmother's beautiful antique dining room set.  A wonderful drop leaf table, 8 chairs, buffet and mirror graced this room.

But our dining and entertaining style is more casual, and we always use the antique oak dining table in the kitchen.  In the past several years, we've only used the formal dining room two or three times.  And as you can tell from this picture, it had become  a storage room for guitars, glassware and even a bread machine.  


One day our friend Melanie saw the guitars in the room and suggested that we re-purpose the room into a music room.  Melanie is an interior designer, and she has a great eye for functionality and design.  She recommended we set up a coffee table and comfy chairs for playing guitar.  She thought that hanging guitars on the wall would serve as artwork.  Mike and I loved the idea!

So this Spring I packed up the glassware and items that were being stored in the buffet.  We then moved the antique dining room set into storage, to be sold later.

New modern light fixture in the music room
First on the list was replacing the horrible brass light fixture.  We found a beautiful modern light fixture on sale at Lowe's, and Mike promptly hung it.  We then donated the brass light fixture to Habitat for Humanity's Re-Store.

We retrieved my square metal and glass coffee table from our storage unit, and it became the centerpiece of the room.


Fabric for our new chairs


We started shopping for chairs for this room.  Our criteria was a comfy chair with low arms so we could easily play guitar.  We wanted small chairs that would not overpower the room, and of course we wanted a reasonable price.

After a lot of shopping, we found the perfect chair.  And we were happy to discover that the chairs were made locally by Best Furniture Company in Indiana.  We picked a fun fabric and placed the order for the chairs.


Sample paint colors with new chair


The chairs arrived about four weeks later, and we set them up in the dining room and began to search for paint colors.  Melanie suggested a darker color on the bottom and lighter color on the top to take advantage of the existing chair rail.

We bought sample paint at the Sherwin Williams store, and tried it out on the walls.  We decided on Sierra Redwood(SW7598)  for the bottom and Interactive Cream(SW6113) for the top.


New music room


And we ABSOLUTELY LOVE how this room turned out.  The only thing left to finish is hanging the guitars on the wall once we purchase hangers.

Mike and I find it so convenient now to pick up a guitar, sit down in a chair and play a few tunes.  If only this new music room would automatically improve my guitar skills...


So, if a room isn't working out for you, or you are tired of all that junk, don't be afraid to change it.    We are quite happy to be making this house our own, with rooms that reflect our personality and hobbies!

Hmm...I wonder what room is next???

Diane


Tuesday, July 1, 2014

Beauty of summer

Sunset over the neighbor's house
I can't help but marvel at the beauty of summer.

Brilliant colors and amazing clouds surround me and remind me to slow down and soak it all in.

I hope you enjoy a few pictures from the past couple of weeks...


Florescent pink geranium

Bright yellow lily

Hmm...has there been a  rabbit munching on this lily?

Purple spikes

Yellow day lily

Clouds over Eagle Creek Reservoir 

Don't forget to stop and smell the roses this summer in the middle of a busy time of picnics, vacations, baseball games and concerts.  Oops, guess I forgot to take pictures of roses...

Have a great week!
Diane
Friday, June 20, 2014

DIY: Denim patchwork tablecloth

Sitting on the screen porch during a thunderstorm with a glass of Cabernet, I got this brilliant idea!  Why not make a tablecloth for the patio table?  It's a 48 inch round table, and I started to think about what fabric I had in my supply that was durable and washable.  And voila!  Denim!


I had been collecting denim over the past couple of years to create my own design of denim purses.

And like most hobbies, one day you suddenly realize  that you've collected more than you can use...

And so it seemed like a tablecloth was a great way to use excess supply of denim.


And so I started my tablecloth with a vague notion of large pieces of denim that I could piece together. Next thing I knew, I was imagining a tablecloth made of patchwork denim "quilt" blocks.  I can't say where that idea came from except from my long lineage of quilters including my grandma, mom and sisters.  

Here's a quick review of the steps in making this patchwork denim tablecloth:

1.  I created a 6 inch square block out of cardboard and used this to trace on different pieces of denim jeans.  I also created a  6 inch by 12 inch card board block, and traced this on the denim to add some interest to the tablecloth.       
Supplies: Denim, scissors, ruler and cardboard
                         
2.  I cut out so many denim blocks that my hand ached for days.  Glad for a good scissors, I wished I had a rotary cutter instead.  

3.  I didn't want a long tablecloth that would be in my lap while I was eating, so I tentatively planned on a 54 inch diameter tablecloth.  Basically this would cover the 48 inch table and hang down a couple of inches on the sides.

4.  I pinned the blocks together in rows, and laid these out on the table until I thought I had enough rows.  I alternated light and dark denim wherever possible to give it a patchwork appearance.  
Always good to have a good helper like Blue Belle!


5.  To prevent fraying of the denim, I used a zig zag stitch on the edge of each block of fabric.  This is a very tedious step, and believe me when I say I used up two spools of thread on this project.
Zig Zag stitches


6.  I stitched the fabric blocks by pinning the right sides together and sewing a straight 1/4 inch seam.    I then pressed the seams open to give them a flat appearance.


7.  I then sewed the rows together by pinning the right sides together and sewing a straight 1/4 seam.  Once again I pressed the seams open.  As I sewed the rows together, I realized that each row should be the same length, and I added a few more blocks to some of the rows.

8.  The next step was cutting out the round shape of the tablecloth.  Here's where I asked Mike for some help.  We located the center point of the fabric, and using a 27 inch string (the radius or half the finished size of 54 inches)  with a Sharpie tied to the end of the string, Mike traced  a circle around the sewn cloth.  
Mike and Blue Belle working with string
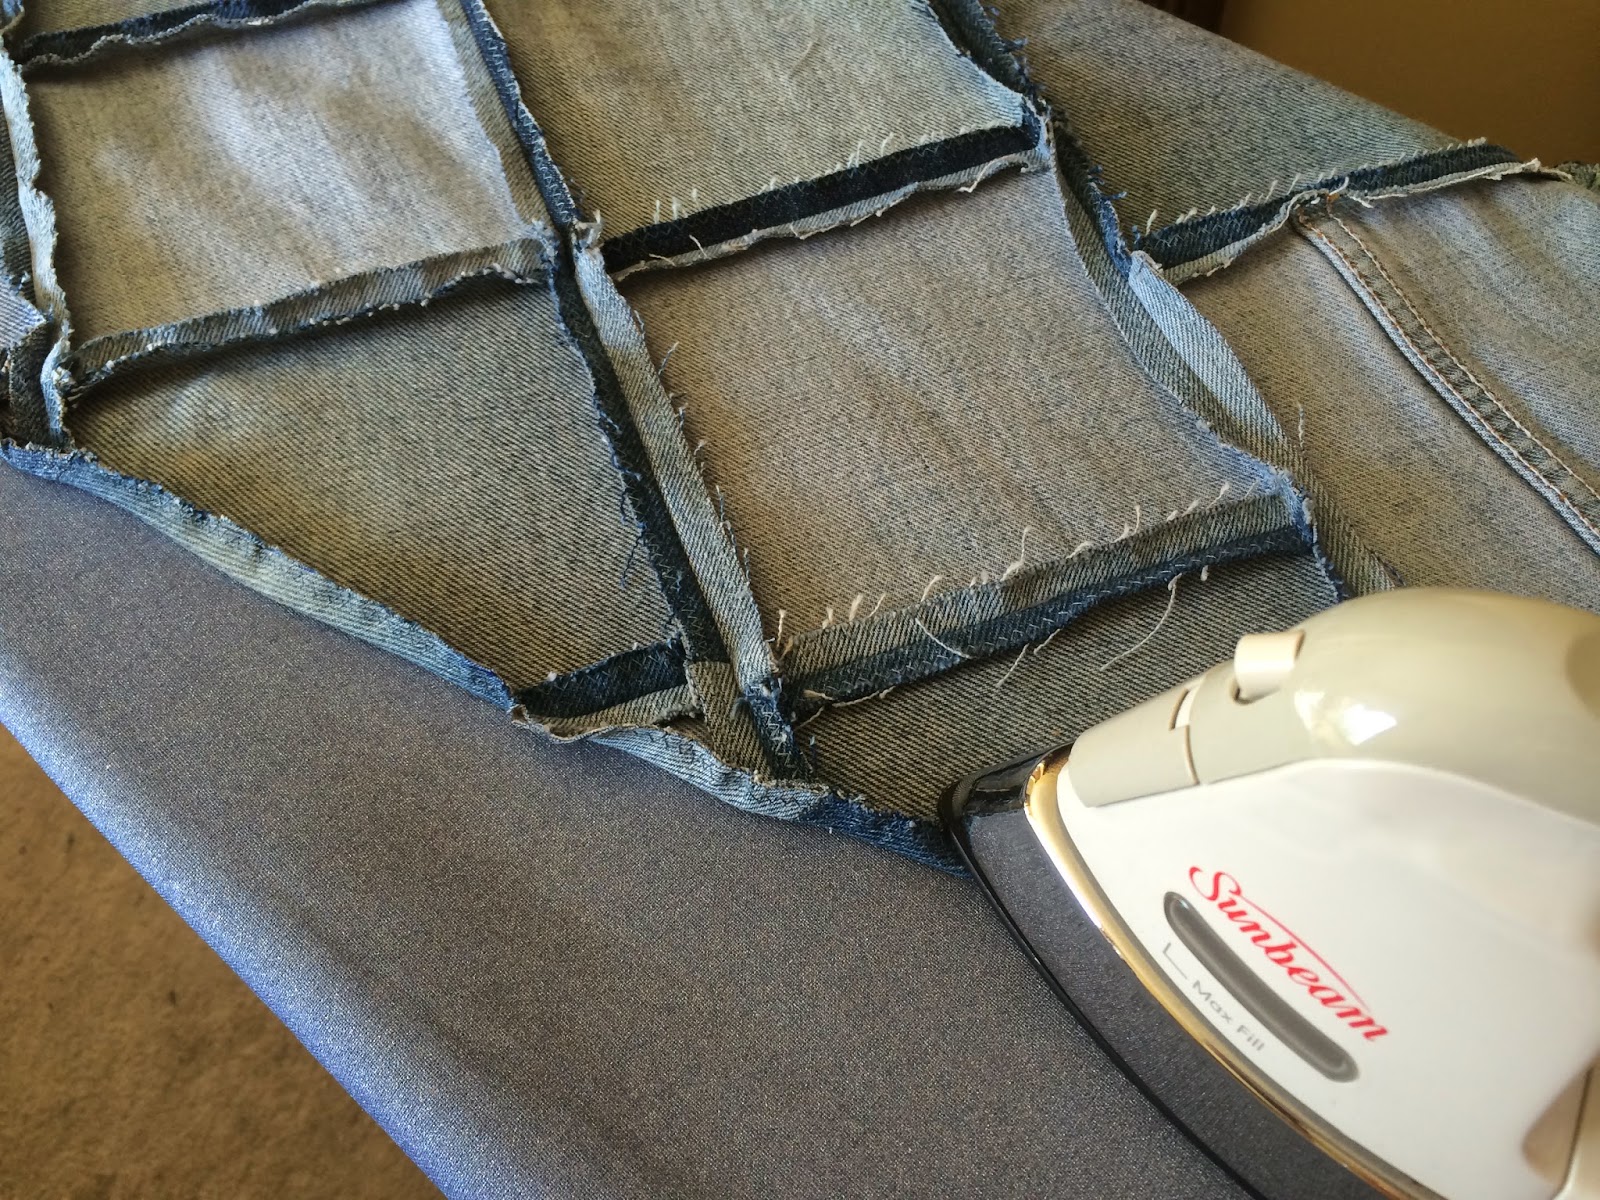
9.  I cut the fabric using the guidelines from the Sharpie.  The next step was to zig zag stitch the edge, and press 1/4 inch of fabric under the tablecloth.
Pressing the 1/4 inch seam around the tablecloth

10. I then sewed the 1/4 inch seam around the outside of the tablecloth.

Sewing 1/4 inch seam
11. As final steps, I washed the tablecloth, and then cut off any loose threads on the underside of the tablecloth.  I then pressed the tablecloth before using it.

And here is the finished product:  a denim patchwork tablecloth.  


Overall, I am very happy with the result of this little impromptu project.  I love the colors and patchwork design.  I like the heavy denim fabric and how it protects the glass table top.  

Here are some things that surprised me about this project:

1. It took a very long time.  I estimate that I spent about 25 hours on this project!  WOW!  Much longer than I expected!

2. Denim is a tough fabric to sew.  I broke at least one sewing machine needle sewing this thick fabric!

3. The tablecloth isn't as flat as I expected. And when you set a glass on the tablecloth, you have to be careful to avoid the seam, or the glass may tip over.

4.  Ideally you might want a backing on the tablecloth to avoid further fraying of the fabric.  I thought about it, but I realize I was "done" with this project, and good enough was good enough!

5.  My cat loves it! 


I hope you are having a great week!
Diane

Tuesday, June 17, 2014

DIY: Converting antique bed to queen mattress

Original full size antique bed
It was the week before the Indy 500 Race, and we had two couples coming for the weekend.
One of our guest rooms was well-equipped with a queen size bed, but the second guest room had a full size bed(that previous guests complained about).

Granted the second guest room was filled with a beautiful antique bed and matching dressers over 100 years old, but that was part of the dilemma. Do we replace the mattress with another full size mattress, or could we somehow fit a queen size mattress?


When I initially approached Mike about the idea of a queen size mattress, he didn't want to remove the antique furniture in the room.  But a funny thing happened overnight.  Mike woke up with an idea for converting the full size antique bed into a queen size antique bed.  And his idea was to preserve the original antique bed without damage, in case the Antiques Road Show ever came to town.

Of course as these things happen, we had only 3 days to find and buy a mattress, convert the antique bed, have the mattress delivered and be ready for guests on Thursday evening.

Were we up for the challenge, or just plain crazy?  Yes and yes.


Mike did all the work on this project, and I asked him to describe his steps.  

1.  Measured headboard and foot board width and checked queen mattress dimensions on Google.  Determined that headboard and foot board were just slightly smaller than width of a queen mattress.  Decided we could make this work.

2.  Removed full size mattress and box spring set to gain access to the embedded bolts of the antique wooden side rails.  Removed the side rails from bed with quarter-turn repetitive turns.

3.  Checked the size of the embedded captive nuts in headboard and foot board by inserting 3/8" and 5/16" bolts.  These did not fit and were not a common thread.

4.  Used a long magnet stick and ice pick to extract the non-standard captive nuts from the square leg sections of the foot board and headboard.

Removable metal tab
5.  Since it had been so difficult to remove the embedded captive nuts(with magnet and ice pick), I decided to create steel tabs that could be used to easily remove the new nuts.  I also decided to use 5/16" tee-nuts.  To create the steel tabs,  I  cut 4 pieces of steel, ¾” wide and 1/8” thick.  I then drilled holes for the 5/16” tee-nuts, and I silver-soldered the nuts into the steel stock and cut them flush with the stock.  So now I have a common size nut(5/16") and a removable tab.


Queen size metal frame


6.  We purchased a queen metal frame designed for use with a modern brass bed.  This had brackets on each end designed to attach to a headboard and foot board.


Paper template tracings


7. Next step was to create wooden adapters as an interface between the metal bed frame and headboard and foot board. This was necessary so we didn't damage the antique.  I created a paper template of the holes by affixing a piece of paper over the headboard and foot board holes and used a lead pencil to lightly rub and create an outline of the holes that match the dowel pin locations and also the access hole to the  captive nut.

8. Using the paper templates, I created four oak transition pieces.  I drilled 1/2" dowel pin holes and 5/16" holes for the bolts(which matched the 5/16" diameter bolts in the new bed frame.

 9.  I used the largest bolts possible for maximum strength.

Mike affixing the oak adapter pieces
10.  After drilling these four oak adapters, I mixed various wood stains to get the right  color to match the antique.  I stained those surfaces that would be seen outside the bed frame.

11.  The dowel pins were installed to where they protruded slightly from the oak adapter pieces so that I could align them to the headboard and foot board.  At this point I  tapped them in with a small hammer and inserted the 5/16” bolts through the  captive nut assemblies on each corner to tightly secure them to the antique headboard and foot board.

Bolts and dowels in place
View from outside the bed


12.  With the wooden adapters secured,  we stayed consistent with the original bed frame height and to be able to store stuff under the bed.   I raised each corner of the bed frame  and used  5/16” carriage bolts, washers, and nuts through the slots of the metal  bed frame to secure it firmly to the headboard and foot board.

New dowel legs for additional support
13.  I decided to use a 2" diameter hardwood dowel (stained to match the wooden adapters) to create 5 supports for the correct height of the metal bed frame.  I drilled the top of each of the 5 supports with a 1” Forstner bit to slip over the five vertical tubular steel  foot  supports(already on the metal bed frame). I drilled the bottom with a 3/8" hole to fit the adjustment screw on the metal frame.

14. I hammered furniture t-nuts into the bottom of each of these dowel sections, and threaded the feet into them.   I slid these wooden leg extensions onto the  bed frame and used aluminum shim stock to take up the slack between the vertical tubular steel and the 1”  diameter holes.

Queen mattress in place
Finished product
The project was finished ahead of schedule, and our guests enjoyed the new bed during the Indy 500 race weekend!

Mike did a fantastic job completing this project, effectively compromising between his desire to keep the antique bed intact, and my desire for a queen size bed.  I am now convinced he can do anything...

Diane

Monday, June 2, 2014

4 years cancer-free!

It's a subject I don't talk much about, but I am a breast cancer survivor.  As I told a friend yesterday, it doesn't define me, it's just something that happened to me.  I continue to travel to Des Moines annually for my mammogram, blood tests and appointment with my oncologist even though it's 450 miles away. I don't know, but there's something very comforting about the doctor who has seen you go through all of this.

So last week Mike and I trekked to Des Moines for this annual check up, and all is well!  No signs of cancer!  I don't think about cancer a lot, but when this appointment approaches each year, I start to get nervous.  And on the day of the appointment, I'm sure I'm holding my breath playing all the "what ifs" through in my mind.  And when the doctor says "the mammogram is fine", I start to breathe again.  If you or a loved one has been in this situation, I know you understand.


And I push cancer to the recesses of my mind for another year, or until some other health issue where my brain immediately goes to cancer.  I am getting used to this sub-process that continually goes through my brain.

Emily and Brian


The other good thing about the trip to Iowa is I get to hook up with my pals from working days.  It made for an action packed week, but it was so much fun to talk and laugh and catch up on life.


We visited with Brian, Emily and Maggie and got to meet the newest addition to the family, Brody.  They are very busy with two small children, but they still manage to have fun!

Maggie, Emily and Brody


Dinner with Kristi


I had a great dinner with my friend Kristi at a new restaurant in Ankeny.  We reminisced about our car-pooling days which seemed like yesterday (actually 3 years ago).  We talked for hours, and it seemed like I had never moved away.

I enjoyed a quick breakfast with Joyce, and we packed a lot of talking into a short hour.  And I lived vicariously with her upcoming travel to London, Spain and Morocco.


Mike, Gary and Joleen

Then it was on to drinks and dinner with Gary, Roby, Joleen and Randy.  We laughed and laughed about everything from jobs, to raising kids to Mike and I learning to live together 24x7.


And  we had breakfast with Ruth and caught up on her new summer job in a greenhouse.  She is having a blast working hard and learning lots of new gardening stuff.


I am reminded that everything continues to change.  My friends and their lives keep moving ahead, but I am comforted to know that our years of working and playing together is a common bond that doesn't go away with a few hundred miles...

And so we're back in Indy now.  June has arrived, bringing Mike's "summer vacation" and a clean slate of time.  I'm sure new adventures await...

Thanks for taking the time to read my blog.  I appreciate your interest in my crazy life, and I welcome your comments any time!

Diane